Online Campus - Discussion - Posting New
Creating a New Discussion Post
- Enter a course
- Select Course Work from the course menu
- Select Discussions
- Select the name of the topic where you are posting a message
- The discussion topic will become active.
- Select Start a New Thread (Do not do this if you are instructed to respond to an instructor's post)
The Discussion Dialogue Box
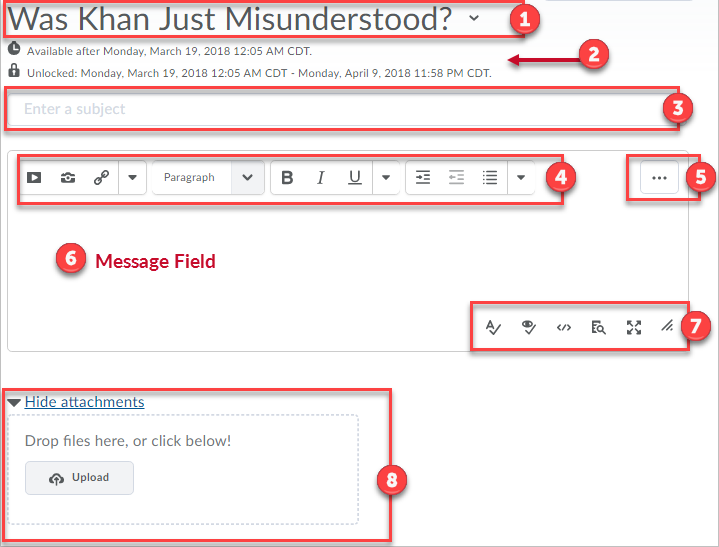
- Topic Title: Select the drop arrow to see available menu options
- Discussion Restrictions and/or Date Settings (Dependent):
- If your instructor has added any conditions to the topic, such as availability dates and/or lock settings, you will see them here. Many discussions have points assigned to them, so pay attention to due dates.
- Subject: Enter a subject for your discussion.
- Message HTML Editor Toolbar: Various options that can be used to edit discussion text.
- Message HTML Editor Toolbar - More Option: Depending on your screen resolution, you may have the "more" button available. When selected, more options that are available for text editing will be displayed.
- Message Field: Enter your discussion message in this field.
- Message Field Options:
Options that can be applied to text or the text area.
- Check Spelling: Checks spelling (not grammar)
- Edit HTML Source: Selecting this option will open the text in an HTML only view.
- Preview: Displays your text the way others will access.
- Toggle Full Screen: Expands the Message Field box to allow for more input space. Be aware that your text will conform to the user's screen size.
- Resize Window: Select and drag to expand the Message Field box with precision.
- Attachment Option: Add an attachment if applicable.