Online Campus - Email: Basics
About the Email Tool
The Email Tool is used to receive and store your course emails. Here are a few items to take note of:
- External email messages (Yahoo, Gmail, and Hotmail) cannot be received in Online Campus. (No SPAM!)
- You will not receive @columbiastate.edu emails in Online Campus. You must check your school email in ChargerNet.
- You can organize your messages by creating folders.
- There is one email tool per person so users will be able to receive all their Online Campus email messages on one location.
- To SEND an email, use the classlist tool.
Email Size Limits
All TBR schools share the Online Campus server . Therefore, there are size limits for each user.
Maximum Email Size: 10 MB
Maximum Message Attachment Size: 10 MB
Total
Email Tool Size Per Student: 100MB
Note: Due to the size limitations, it is not recommended that assignment submissions be emailed. There is an Assignment tool for assignment submissions.
New Email Notification
When a new email is received, a red dot will appear on the email notification icon and "New Email" will be listed on the course homepage in the Updates widget.

Note: Since there is one email tool per user, and not per class, the notification of a new email in the Class Updates widget does not necessarily mean that the email is from a person in the class you have entered.
Accessing the Email Tool
There are three ways to access the Email tool:
- Select Email on the Minibar at the top of any page in Online Campus.
- Enter one of your courses, select Communication from the course menu, then select Email
- Enter one of your courses and select New Emails from the Updates widget.
Email Options
The top section of the email tool contains compose options, management options, and settings options.
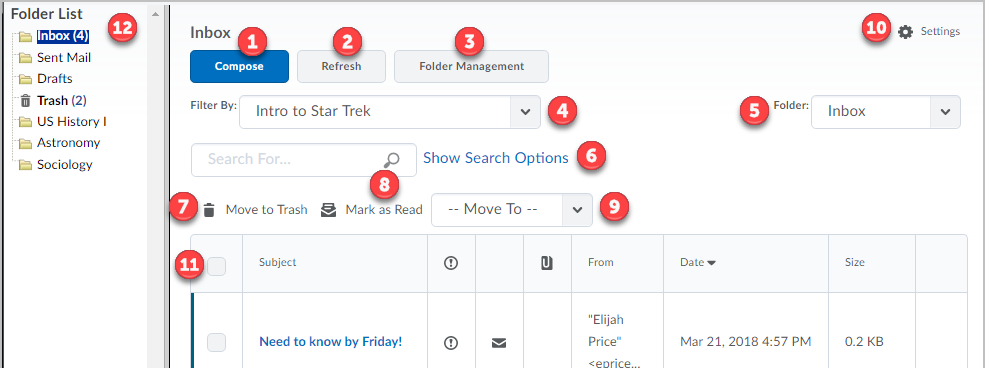
- Compose: The compose feature does not work unless you know the receiver’s Online Campus email address. You do not use @columbiastate.edu addresses in Online Campus. To send email, use the Classlist tool.
- Refresh: Refresh will reload the message list page and check for new emails.
- Folder Management: Folder Management will take you to a page where you can sort the messages received in folders that you create.
- Filter By: The Filtering messages option provides you with a quick
way to sort and view your messages by specific course associations or
group associations.
- All Messages: Includes course messages, and messages from Online Campus administrators.
- All Course Offerings: Displays messages associated with any course offering
- Specific Course Associations: Displays messages associated with a specific course.
- Folders: Use the Folder drop-down list to display
messages kept in a specific folder. The folders are either
system-created or created by you. System folders include:
- Inbox
- Sent Mail
- Drafts
- Trash
- Search: Search allows you to for emails from specific people, with a specific subject, and/or search the body of the email. You must select Show Search Options to ensure the appropriate "Search In" areas are selected.
- Move to Trash: Selecting the Move to Trash options moves to email to the Trash folder. Deleting the message from the Trash folder removes it permanently from your view. However, the emails are not permanently deleted from the system.
- Mark as Read: To mark a message as read:
- Select checkbox next to the message or messages you want to mark as read.
- Click the Mark as Read icon.
- Move To: It is important to organize your email
messages. Move To allows you to move email messages to system folders or
folders you create. To move a message:
- Select the checkbox next to the message or messages you want to move.
- In the Move To drop-down list, select the folder you want to put the message(s) in.
- Settings: Provides users with some personalization
and view options. Turn your settings on or off by selecting the checkboxes
- Include original message in email replies: When you reply to an email, the original message will be included with your reply.
- Save a copy or your sent messages to the Sent Mail folder: A copy of the messages you send, with attachments, will be saved to the Sent Email folder.
- Email Signature: Add text that will appear at the bottom of the every email messages you send.
- Show the Message Preview pane: Using the preview pane allows you to read messages from within the Message List page. If you turn this option off, clicking on a message will open a new window containing the message.
- Show the Folder List pane: This option displays the folder pane to the left of the Message List area. The folder pane contains the same content as you would find in the folder drop-down list.
- Email List Grid
- Folder List Area
Email List Grid
The email list grid provides you with information about the email, allows you to select to email, and is used to sort email. Users can sort by the column headings: Subject, Priority, Attachment, From, Date, and Size.
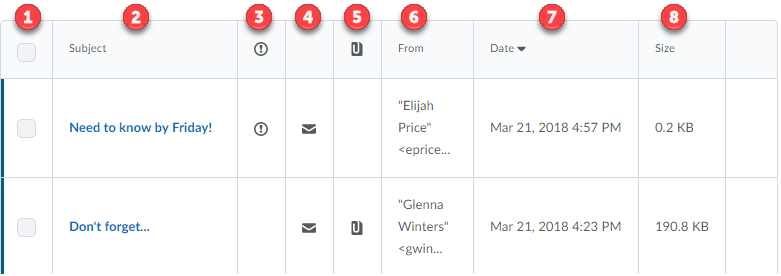
Going from left to right, each column is defined below:
- Select Check Box: this column contains the selection checkboxes for each email. Once selected, users can apply the options in the top area of the email tool. (Example: Move To option)
- Subject: This column displays the subject of the email.
- Priority: This column displays if the sender tagged the email as a High or Low priority.
- Status (Read or Unread): This column indicates the status of the email. A
black envelope indicates the email has not been read. Once the email has
been accessed, the envelop will disappear.
- Note: All faculty have access to a track email option that will log when the recipient has accessed an email.
- Attachment: This column will indicate iff the email contains an attachment.
- From: This column indicates whom the email is sent.
- Date: This column displays the date and time the email was sent.
- Size: This column displays the size of the email.
Sorting
Sort emails by selecting one of the column headings: Subject, Priority, Attachment, From, Date, or Size. The Status column is not sortable.
File Restrictions
The Online Campus vendor restricts the following file types from attachments: ASP, ASPX, EXE, BAT, DLL, COM, ASA, ASAX, ASCX, ASHX, ASMX, AXD, CDX, CER, CONFIG, IDC, CS, CSPROJ, JSL, LICX, REM, RESOURCES, RESX, SHTM, SHTML, SOAP, VB, VBPROJ, VJSPROJ, VSDISCO, WEBINFO, INI, MSI, MSP, SCR, SCT, WSF, WSC, VBS, VBE